昨天,介绍了有关在宝塔面板下配置安装Nxtcloud15的教程,但是安装完成后,在后台的概览里显示安全设置及警告的提示信息。
如图:

下面,我就总结下如何处理安全设置及告警提示信息。
1、您的数据目录和文件可以从互联网直接访问。.htaccess 文件不起作用。强烈建议您配置 Web 服务器,以便数据目录不再可访问,或者你可以将数据目录移动到 Web 服务器文档根目录。
解决方法是修改nextcloud绑定的网站配置文件,添加nextcloud常用目录禁止访问即可,加入下列代码
1
2
3
| location ~ ^/(?:build|tests|config|lib|3rdparty|templates|data)/ {
deny all;
}
|

2、PHP的安装似乎不正确,无法访问系统环境变量。getenv(“PATH”)函数测试返回了一个空值。 请参照安装说明文档 ↗中的PHP配置说明查阅您服务器的PHP配置信息,特别是在使用php-fpm时。
从宝塔文件管理,打开/www/server/php/72/etc/php-fpm.conf,在其尾部添加一行
1
| env[PATH] = /usr/local/bin:/usr/bin:/bin:/usr/local/php/bin
|
保存并重启PHP即可解决该问题。

3、通过 HTTP 访问网站不安全。强烈建议您将服务器设置成 HTTPS 协议,请查阅 安全贴士↗。
如果以前申请过SSL,可以将crt和key用记事本打开,分别黏贴到下图中。

如果没有,也可注册宝塔会员,免费申请,申请完点击部署即可。

4、您的网页服务器未正确设置以解析“/.well-known/caldav”。更多信息请参见文档。
您的网页服务器未正确设置以解析“/.well-known/carddav”。更多信息请参见文档。
这两个警告可以一起解决,出现该提示一般是因为这两个路径的伪静态设置有问题,导致无法正常访问。
解决方法就是添加两行重定向配置
1
2
| rewrite /.well-known/carddav /remote.php/dav permanent;
rewrite /.well-known/caldav /remote.php/dav permanent;
|

5、未找到 PHP 的 “fileinfo” 模块。强烈推荐启用该模块,从而获得更好的 MIME 类型探测结果。
因为php环境默认是没有安装fileinfo这个扩展模块的,所以需要手动去宝塔PHP管理选项中安装fileinfo扩展。

6、内存缓存未配置,为了提升使用体验,请尽量配置内存缓存。更多信息请参见文档。
安装php的Memcached和apcu模块(注意是memcached,非memcache),我选的是Memcached和apcu

编译安装完毕之后,从宝塔面板打开/www/wwwroot/你的域名/config/config.php,手动给nextcloud的配置文件中添加一行设置,指定使用APCu作为缓存
第1行为指定本地缓存为APCu,第2、3行为指定分布式缓存为Memcached
1
2
3
4
5
6
7
8
9
10
11
12
13
14
15
16
17
18
19
| 'memcache.local' => '\\OC\\Memcache\\APCu',
'memcache.distributed' => '\\OC\\Memcache\\Memcached',
'memcached_servers' =>
array (
0 =>
array (
0 => 'localhost',
1 => 11211,
),
);
|

7、PHP 的 OPcache 模块未载入。推荐开启获得更好的性能。
安装php的opcache扩展模块

并改为下图的参数
1
2
3
4
5
6
7
8
9
10
11
12
13
| opcache.enable=1
opcache.enable_cli=1
opcache.interned_strings_buffer=8
opcache.max_accelerated_files=10000
opcache.memory_consumption=128
opcache.save_comments=1
opcache.revalidate_freq=1
|

8、该实例缺失了一些推荐的PHP模块。为提高性能和兼容性,我们强烈建议安装它们。
imagick
安装php的imagemagick扩展模块

9、数据库中的一些列由于进行长整型转换而缺失。由于在较大的数据表重改变列类型会耗费一些时间,因此程序没有自动对其更改。您可以通过命令行手动执行 “occ db:convert-filecache-bigint” 命令以应用挂起的更改。该操作需要当整个实例变为离线状态后执行。查阅相关文档以获得更多详情。
- filecache.mtime
- filecache.storage_mtime
通过SSH登录到服务器的命令模式下,并cd到站点目录下,输入
1
| php occ db:add-missing-indices
|
提示如下信息

意思是需要使用www用户权限来修改,再次输入
1
| sudo -u www php occ db:add-missing-indices
|
提示如下图信息,并输入 y


10、HTTP的请求头 “Referrer-Policy” 未设置为 “no-referrer”, “no-referrer-when-downgrade”, “strict-origin” or “strict-origin-when-cross-origin”. 这会导致信息泄露。
需要设置一个Referrer-Policy请求头来提高安全性。
1
| add_header Referrer-Policy "no-referrer";
|

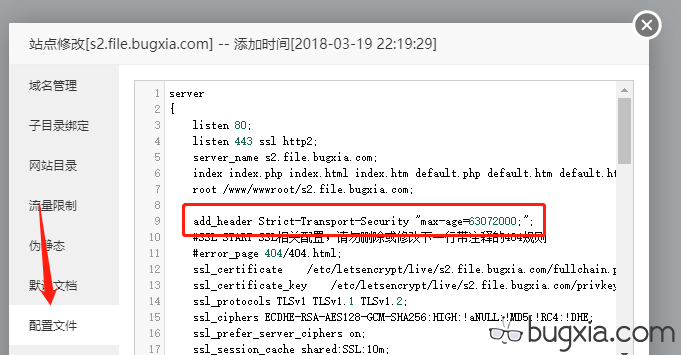
解决方法还是修改nextcloud绑定的网站配置文件,添加一行header信息
1
| add_header Strict-Transport-Security "max-age=63072000;";
|

保存即可生效
1
2
3
4
5
6
7
8
9
10
11
12
13
14
15
16
17
18
19
20
21
22
23
24
25
26
27
28
29
30
31
32
33
34
35
36
37
38
39
40
41
42
43
44
45
46
47
48
49
50
51
52
53
54
55
56
57
58
59
60
61
62
63
64
65
66
67
68
69
70
71
72
73
74
75
76
77
78
79
80
81
82
83
84
85
86
87
88
89
90
91
92
93
94
95
96
97
98
99
100
101
102
103
104
105
106
107
108
109
110
111
112
113
114
115
116
117
118
119
120
121
122
123
124
125
126
127
128
129
130
131
132
133
134
135
136
137
138
139
140
141
142
143
144
145
146
147
148
149
150
151
152
153
154
155
156
157
158
159
160
161
162
163
164
165
166
167
168
169
170
171
172
173
174
175
176
177
178
179
180
181
| server
{
#基础配置,这些可以照搬宝塔的配置
listen 80;
listen 443 ssl http2;
server_name www.chyiyang.net;
index index.php index.html index.htm default.php default.htm default.html;
root /www/wwwroot/www_chyiyang_net;
ssl_certificate /etc/letsencrypt/live/www.chyiyang.net/fullchain.pem;
ssl_certificate_key /etc/letsencrypt/live/www.chyiyang.net/privkey.pem;
ssl_protocols TLSv1 TLSv1.1 TLSv1.2;
ssl_ciphers ECDHE-RSA-AES128-GCM-SHA256:HIGH:!aNULL:!MD5:!RC4:!DHE;
ssl_prefer_server_ciphers on;
ssl_session_cache shared:SSL:10m;
ssl_session_timeout 10m;
error_page 497 https://$host$request_uri;
#nextcloud包含了403和404的错误页面
error_page 403 /core/templates/403.php;
error_page 404 /core/templates/404.php;
#HSTS、缓存设置
add_header Strict-Transport-Security "max-age=15768000; includeSubDomains; preload;";
large_client_header_buffers 4 16k;
client_max_body_size 10G;
fastcgi_buffers 64 4K;
gzip off;
#宝塔默认是include调用PHP相关配置,这里稍稍修改了一下,注意php版本
#加入了front_controller_active这项参数以删除页面URL中的index.php
location ~ [^/]\.php(/|$)
{
try_files $uri =404;
fastcgi_pass unix:/tmp/php-cgi-72.sock;
fastcgi_index index.php;
include fastcgi.conf;
include pathinfo.conf;
fastcgi_param front_controller_active true;
}
#一键申请SSL证书验证目录相关设置
location ~ \.well-known{
allow all;
}
#nextcloud一些关键目录的权限设置
location ~ ^/(data|config|\.ht|db_structure\.xml|README) {
deny all;
}
#静态资源重定向1
location ~* \/core\/(?:js\/oc\.js|preview\.png).*$ {
rewrite ^ /index.php last;
}
#webdav重定向
location / {
rewrite ^ /index.php$uri;
rewrite ^/caldav(.*)$ /remote.php/caldav$1 redirect;
rewrite ^/carddav(.*)$ /remote.php/carddav$1 redirect;
rewrite ^/webdav(.*)$ /remote.php/webdav$1 redirect;
rewrite ^(/core/doc/[^\/]+/)$ $1/index.html;
#静态资源重定向2,支持使用acme脚本在申请证书时对域名的验证
if ($uri !~* (?:\.(?:css|js|svg|gif|png|html|ttf|woff)$|^\/(?:remote|public|cron|status|ocs\/v1|ocs\/v2)\.php|^\/\.well-known\/acme-challenge\/.*$)){
rewrite ^ /index.php last;
}
}
#静态资源重定向3
location ~* \.(?:png|html|ttf|ico|jpg|jpeg)$ {
try_files $uri /index.php$uri$is_args$args;
access_log off;
}
location ~ ^/(?:updater|ocs-provider)(?:$|/) {
try_files $uri/ =404;
index index.php;
}
#对静态资源添加header
location ~ \.(?:css|js|woff|svg|gif)$ {
try_files $uri /index.php$uri$is_args$args;
add_header Cache-Control "public, max-age=15778463";
add_header X-Content-Type-Options nosniff;
add_header X-XSS-Protection "1; mode=block";
add_header X-Robots-Tag none;
add_header X-Download-Options noopen;
add_header X-Permitted-Cross-Domain-Policies none;
add_header Referrer-Policy "no-referrer";
access_log off;
}
#caldav和#carddav
   rewrite /.well-known/carddav /remote.php/dav permanent;
   rewrite /.well-known/caldav /remote.php/dav permanent;
location ~ .*\.(gif|jpg|jpeg|png|bmp|swf|js|css)$
{
expires 30d;
access_log off;
}
#access_log /www/wwwlogs/www.chyiyang.net.log;
}
|


