使用Google VPS 来做自己的离线下载服务器,下载完后自动上传到 Google Drive ( 以后简称 GD ) 里存储,再用 nPlayer 登录 Google Drive 实现在线观看。
安装
下面介绍如何搭建一个自己的离线下载并上传到 GD 的环境。
系统环境
我的系统是 CentOS 7 ,其他 Linux 发行版请自行调整相关命令或系统环境配置,但 VPS 必须是 KVM 架构!
安装宝塔 Linux 面板
1
| $ yum install -y wget && wget -O install.sh http://download.bt.cn/install/install_6.0.sh && bash install.sh
|
这是 宝塔面板官网 ,如果如果不会用可以上去看下使用手册。
安装 Nginx 和 Redis
面板安装好后,通过浏览器打开并登录面板,在面板的 软件管理 里面安装 Nginx 和 Redis。
其中,Nginx 是用来作为访问 AriaNg 的服务器用的;Redis 是用来做上传到 GD 的任务队列的,如果不做队列处理,大量任务同时上传到 GD 的话会出现很多问题。
安装 Aria2
Aria2 是一款开源、轻量级的多协议命令行下载工具,支持 HTTP/HTTPS、FTP、SFTP、BitTorrent 和 Metalink 协议,我们以后的下载任务都会交给它。
一键安装 Aria2 :
1
| $ wget -N --no-check-certificate https://raw.githubusercontent.com/ToyoDAdoubi/doubi/master/aria2.sh && chmod +x aria2.sh && bash aria2.sh
|
下面是我自己根据上面脚本做的修改版,解决了在开启自动更新 BT-Tracker 服务器 时会强制重启 Aria2 导致 Aria2 任务有可能出现异常的问题:
1
| $ wget -N --no-check-certificate https://raw.githubusercontent.com/meishixiu/note/master/Aria2%2BAriaNg%2BRclone%2BGoogleDrive/aria2.sh && chmod +x aria2.sh && bash aria2.sh
|
两个脚本任选一个就行。
打开配置文件 /root/.aria2/aria2.conf,替换为 aria2.conf 里面的配置;
最后把里面的 Aria2 RPC 密钥 rpc-secret 自己随便换一个,然后重启 Aria2 使配置生效;
文件的保存路径 dir 我用的是后面要安装的 AriaNg 网站的一个子目录,这样做的目的是如果需要通过网站在线浏览下载的文件列表,可以稍微改改 Nginx 的网站配置来实现,如果没有这样的需求,那可以随意换一个下载目录。
安装 AriaNg
AriaNg 是一个让 Aria2 更容易使用的现代 Web 前端。为什么这么说呢,因为以前如果要使用 Aria2 ,我们得去记忆大量的 Aria2 的命令和参数才能下载东西,这简直就是噩梦。而如果使用 AriaNg ,只需要用电脑或手机浏览器打开我们的离线下载网站 ( 就是打开 AriaNg ),就能轻松的添加下载任务了。
既然是 “离线下载网站” ,那就得有个 “网站” 的样子,所以我把我的一个域名 lixian.xxx.com 解析到我的离线下载服务器上,然后在宝塔面板的 网站 里 添加站点 ,域名 填写刚才解析过来的 lixian.xxx.com ,根目录 我用的是 /home/wwwroot/lixian.xxx.com,如下图所示:

然后把 AriaNg 下载到 /home/wwwroot/lixian.xxx.com 并解压:
1
2
3
| $ cd /home/wwwroot/lixian.xxx.com
$ wget https://github.com/mayswind/AriaNg/releases/download/1.0.0/AriaNg-1.0.0.zip
$ unzip AriaNg-1.0.0.zip
|
AriaNg 的程序安装好了,下面是设置 AriaNg ,让它与 Aria2 能够连接 ( 通信 )。
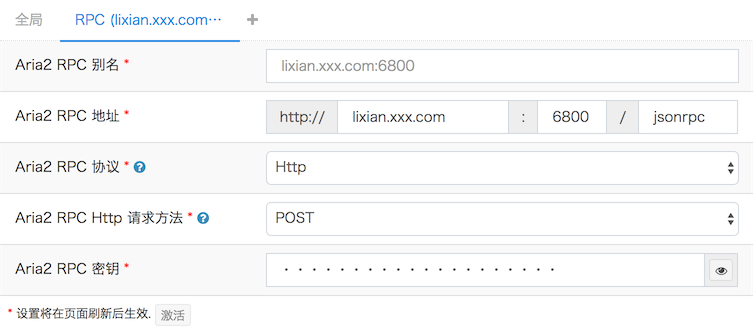
浏览器访问 http://lixian.xxx.com ,点击左侧的 AriaNg 设置 ,再点上面的 PRC 选项卡,把 Aria2 RPC 地址 和 Aria2 RPC 密钥 填上,如下图所示:

如果不出意外,左侧的 Aria2 状态 会显示 已连接
安装 Rclone
Rclone 是一个用于将文件同步到各大云存储商的命令行工具,同时也支持云存储商之间的文件同步。
安装 Rclone:
1
| $ curl https://rclone.org/install.sh | sudo bash
|
Rclone 的 Google Drive 授权配置:
会出现以下信息:
1
2
3
4
| n) New remote
s) Set configuration password
q) Quit config
n/s/q>n
|
输入 n 后按回车键继续
输入 gd 后按回车键继续
 1
 2
 3
 4
 5
 6
 7
 8
 9
10
11
12
13
14
15
16
17
18
19
20
21
22
23
24
25
26
27
28
29
30
31
32
33
34
35
36
37
38
39
40
41
42
43
44
45
46
47
48
49
50
51
52
53
54
55
56
| Type of storage to configure.
Enter a string value. Press Enter for the default ("").
Choose a number from below, or type in your own value
1 / A stackable unification remote, which can appear to merge the contents of several remotes
\ "union"
2 / Alias for a existing remote
\ "alias"
3 / Amazon Drive
\ "amazon cloud drive"
4 / Amazon S3 Compliant Storage Providers (AWS, Ceph, Dreamhost, IBM COS, Minio)
\ "s3"
5 / Backblaze B2
\ "b2"
6 / Box
\ "box"
7 / Cache a remote
\ "cache"
8 / Dropbox
\ "dropbox"
9 / Encrypt/Decrypt a remote
\ "crypt"
10 / FTP Connection
\ "ftp"
11 / Google Cloud Storage (this is not Google Drive)
\ "google cloud storage"
12 / Google Drive
\ "drive"
13 / Hubic
\ "hubic"
14 / JottaCloud
\ "jottacloud"
15 / Local Disk
\ "local"
16 / Mega
\ "mega"
17 / Microsoft Azure Blob Storage
\ "azureblob"
18 / Microsoft OneDrive
\ "onedrive"
19 / OpenDrive
\ "opendrive"
20 / Openstack Swift (Rackspace Cloud Files, Memset Memstore, OVH)
\ "swift"
21 / Pcloud
\ "pcloud"
22 / QingCloud Object Storage
\ "qingstor"
23 / SSH/SFTP Connection
\ "sftp"
24 / Webdav
\ "webdav"
25 / Yandex Disk
\ "yandex"
26 / http Connection
\ "http"
Storage>12 # 12 对应 Google Drive
|
输入 12 后按回车键继续
1
2
3
4
5
6
| ** See help for drive backend at: https://rclone.org/drive/ **
Google Application Client Id
Leave blank normally.
Enter a string value. Press Enter for the default ("").
client_id>
|
什么也不填,直接按回车键继续
1
2
3
4
| Google Application Client Secret
Leave blank normally.
Enter a string value. Press Enter for the default ("").
client_secret>
|
什么也不填,直接按回车键继续
 1
 2
 3
 4
 5
 6
 7
 8
 9
10
11
12
13
14
15
16
17
18
| Scope that rclone should use when requesting access from drive.
Enter a string value. Press Enter for the default ("").
Choose a number from below, or type in your own value
1 / Full access all files, excluding Application Data Folder.
\ "drive"
2 / Read-only access to file metadata and file contents.
\ "drive.readonly"
/ Access to files created by rclone only.
3 | These are visible in the drive website.
| File authorization is revoked when the user deauthorizes the app.
\ "drive.file"
/ Allows read and write access to the Application Data folder.
4 | This is not visible in the drive website.
\ "drive.appfolder"
/ Allows read-only access to file metadata but
5 | does not allow any access to read or download file content.
\ "drive.metadata.readonly"
scope>1
|
输入 1 后按回车键继续
1
2
3
4
5
| ID of the root folder
Leave blank normally.
Fill in to access "Computers" folders. (see docs).
Enter a string value. Press Enter for the default ("").
root_folder_id>
|
什么也不填,直接按回车键继续
1
2
3
4
5
| Service Account Credentials JSON file path
Leave blank normally.
Needed only if you want use SA instead of interactive login.
Enter a string value. Press Enter for the default ("").
service_account_file>
|
什么也不填,直接按回车键继续
1
2
3
4
| Edit advanced config? (y/n)
y) Yes
n) No
y/n>n
|
输入 n 后按回车键继续
1
2
3
4
5
6
7
| Remote config
Use auto config?
* Say Y if not sure
* Say N if you are working on a remote or headless machine or Y didn't work
y) Yes
n) No
y/n>n
|
输入 n 后按回车键继续
1
2
3
| If your browser doesn't open automatically go to the following link: https://accounts.google.com/o/oauth2/auth?access_type=offline&client_id=202264815644.apps.googleusercontent.com&redirect_uri=urn%3Aietf%3Awg%3Aoauth%3A2.0%3Aoob&response_type=code&scope=https%3A%2F%2Fwww.googleapis.com%2Fauth%2Fdrive&state=82f32ec9a39f1f00487d512287676715
Log in and authorize rclone for access
Enter verification code>4/pwBniPjAj1gnadI8njaqWYE1lfxo92Hlw8NnKYGLYlmBfyopyl-mOWs # 填写验证码
|
这时会得到一个链接,把这个链接复制出来,在浏览器中打开,登录谷歌账号,得到一个验证码,填写后按回车键继续
1
2
3
4
| Configure this as a team drive?
y) Yes
n) No
y/n>n
|
输入 n 后按回车键继续
 1
 2
 3
 4
 5
 6
 7
 8
 9
10
11
| Fetching team drive list...
No team drives found in your account--------------------
[gd]
type = drive
scope = drive
token = {"access_token":"ya29.BlRMXReIsfNRXFhrq4EyrOkImRWmfd3DitxdjGz2PVEBROyI_mA0YZPGltmAmjaNLTxZciI3IHHuNyHKwnMbFZbQmO7L4cuwVN3Xh2SFvNatTfwL4XwxOhRQnmgv","token_type":"Bearer","refresh_token":"1/WD0wd8g-w2S6vLJCseQ2PL9X-Wed5nko8JbByU3qLOk","expiry":"2018-12-03T03:00:03.961221503+08:00"}
--------------------
y) Yes this is OK
e) Edit this remote
d) Delete this remote
y/e/d>y
|
输入 y 后按回车键继续
 1
 2
 3
 4
 5
 6
 7
 8
 9
10
11
12
13
14
| Current remotes:
Name Type
==== ====
gd drive
e) Edit existing remote
n) New remote
d) Delete remote
r) Rename remote
c) Copy remote
s) Set configuration password
q) Quit config
e/n/d/r/c/s/q>q
|
输入 q 后按回车键退出。
安装 Python3
使用 Python3 是因为 Aria2 中的任务下载完后需要做一些处理,然后调用 Rclone 上传到 GD。CentOS 7 虽然系统自带了 Python2,但我从来没有学过 Python 这个语言,百度上现学的时候搜出来的都是 Python3 的教程,所以就用 Python3 来做任务下载的后续处理了。
下面是下载 Python3 源码,然后配置、编译、安装步骤:
1
2
3
4
5
| $ wget https://www.python.org/ftp/python/3.6.8/Python-3.6.8.tar.xz
$ tar -xvJf Python-3.6.8.tar.xz
$ cd Python-3.6.8
$ ./configure prefix=/usr/local/python3
$ make && make install
|
安装完后创建一个软连接到 /usr/bin/python3 :
1
2
| $ ln -s /usr/local/python3/bin/python3 /usr/bin/python3
$ ln -s /usr/local/python3/bin/pip3 /usr/bin/pip3
|
使用下面命令查看一下是否生效:
安装 Python 的 Redis 库
安装这个库是因为我要使用 Python 来操作 Redis 。
安装 Python 的 python-telegram-bot 库
1
| $ pip3 install python-telegram-bot
|
安装这个库是因为我要使用 Python 来发送离线任务完成通知到 Telegram 。
上传处理脚本
下载 autoupload.sh 、 add_upload_queue.py 、 work_upload.py 、 clear_down.py 、 config.py 、filter-file.txt 这 6 的文件到放到 /home 里,然后给 autoupload.sh 执行权限:
1
| $ chmod +x /home/autoupload.sh
|
由于我在 Aria2 的配置文件 aria2.conf 里配置了 on-download-complete=/home/autoupload.sh ,他是让 Aria2 下载任务完成后执行这个 shell 脚本,所以把这些脚本放到 /home 里。
然后根据自己的情况修改 config.py 中的配置,比如 Aria2 RPC 密钥 、Aria2 下载目录、Google Drive 上传目录,其他的默认就行了。Aria2 RPC 地址 一般也不用修改,使用 http://127.0.0.1:6800/jsonrpc 这个就行了,因为就在 VPS 本地执行,使用 127 这个更快一些。
其他说明
- 上传使用的是
rclone move 操作,它会在文件上传到 GD 后自动删除 VPS 中的文件 ( 但不会删除被 filter-file.txt 过滤的文件 ) 以达到释放硬盘的目的; add_upload_queue.py 会把解析磁力链接时最开下载的那个已经无用的 Aria2 任务自动删掉,并且还做了很多上传前的细节处理,最后把上传任务添加到上传对列;work_upload.py 会在上传完成后把那个对应的已完成的 Aria2 任务删掉,因为 VPS 中文件都已经被 rclone 移动到了 GD 了,留那个任务也是无用。而且自动清理掉已完成的下任务,可以在所有下载任务都完成后由下面的计划任务自动清理下载目录。
可能有人不太明白,我为什么要搞这么麻烦,还装了 Redis 来做上传队列,让下载任务排队上传。网上不是有一些简单的 shell 脚本,直接在 Aria2 的 on-download-complete 配置里指定这个脚本,下载完后让这个脚本调用 rclone 来上传文件不就行了?下面我来给大家举个例子:
比如我现在下载完了一个 BT 任务,这个任务总共有 47G 大小,173 个文件,目前正在往 GD 上传。我们通过宝塔面板来看一下此时 VPS 的系统状态:

虽然 CPU 什么的都不高,但系统负载却达到了 100% ,宝塔面板加载明显变慢!可以想象,如果不用上传队列加以控制,此时 Aria2 又下载好了几个任务,然后又开始用 rclone 上传新的文件,而我们之前那个 47G 的大包还没上传完,这几个上传任务同时执行,我们的小鸡还不废掉?这只还仅仅只是各种坑中的一个!
计划任务
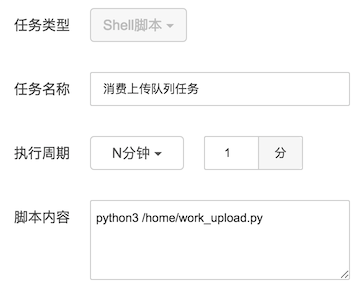
在宝塔面板右侧点击 计划任务,然后添加两个计划任务,具体配置如下:

这个计划任务会每分钟检查一次队列中是否有待上传的任务,如果有,且当前没有任务在执行上传操作就那就开始上传。但是,如果当前有任务正在上传,就跳过,待其上传完后再执行。

这个计划任务会每十分钟检查一次 Aria2 中是否有 正在下载 、正在等待、已完成/已停止 这 3 种状态的任务,如果都没有,那就清理 config.py 中指定的 Aria2 下载目录 ,这样做的原因是长期做下载,下载目录中会遗留很多乱七八糟的无用的文件或文件夹,所以在没有任务的时候清理一下,可以释放服务器的硬盘空间。
但这两个计划任务的执行周期都比较短,时间长了就会在系统里留下体积巨大的日志文件,所以还需处理一下,让他们不写日志。

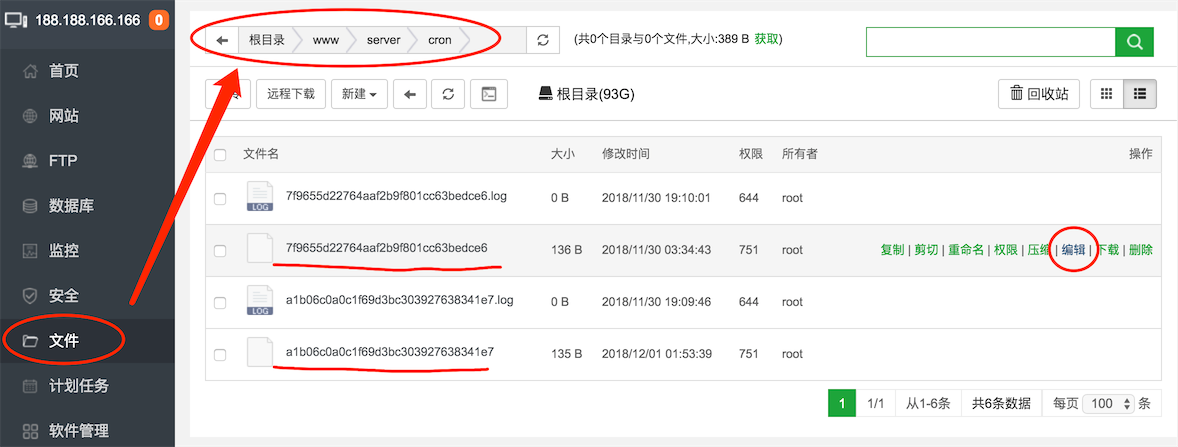
打开 /www/server/cron 这个文件夹,里面存放了刚才由宝塔面板创建的两个计划任务脚本 ( 不带 .log 的那两个文件 ),点击右边的 编辑,把:
1
2
3
4
5
6
7
8
| #!/bin/bash
PATH=/bin:/sbin:/usr/bin:/usr/sbin:/usr/local/bin:/usr/local/sbin:~/bin
export PATH
python3 /home/work_upload.py
echo "----------------------------------------------------------------------------"
endDate=`date +"%Y-%m-%d %H:%M:%S"`
echo "★[$endDate] Successful"
echo "----------------------------------------------------------------------------"
|
改为:
1
2
3
4
| #!/bin/bash
PATH=/bin:/sbin:/usr/bin:/usr/sbin:/usr/local/bin:/usr/local/sbin:~/bin
export PATH
python3 /home/work_upload.py > /dev/null
|
把:
1
2
3
4
5
6
7
8
| #!/bin/bash
PATH=/bin:/sbin:/usr/bin:/usr/sbin:/usr/local/bin:/usr/local/sbin:~/bin
export PATH
python3 /home/clear_down.py
echo "----------------------------------------------------------------------------"
endDate=`date +"%Y-%m-%d %H:%M:%S"`
echo "★[$endDate] Successful"
echo "----------------------------------------------------------------------------"
|
改为:
1
2
3
4
| #!/bin/bash
PATH=/bin:/sbin:/usr/bin:/usr/sbin:/usr/local/bin:/usr/local/sbin:~/bin
export PATH
python3 /home/clear_down.py > /dev/null
|
也就是删掉多余的输出,并且在我们的命令之后添加 > /dev/null
开放端口
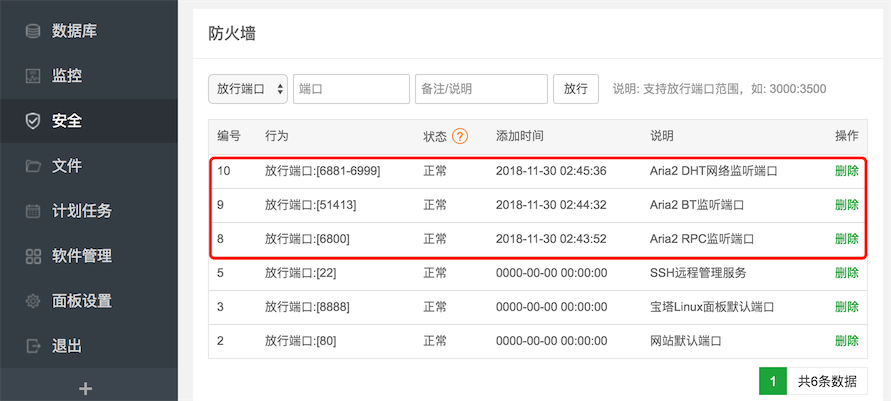
根据 Aria2 的配置,还需要再开放几个端口

Telegram Bot 通知
如果需要通过 Telegram 来接收离线任务完成通知,可以在 config.py 中开启 "enable_tg_bot": True, 并做好相应的配置。其中 tg_chat_id 是通知目标,它的值可以是 个人/群组/频道 的数字 id 或者 带 @ 的 username ;tg_bot_token 则需要私聊 @BotFather 并创建机器人后获取。下面是 Telegram 通知的效果截图:

至此,所有安装、配置的工作已全部完成。
使用
iOS / 安卓平台在线播放
iOS 上可以在 nPlayer 的 网络 里添加 Google Drive ,登录账号后就可以在线看片了。另外还可以使用 nPlayer 投屏到电视上播放。


